Using the Graphical Hazards Generator (GHG)
for Watch-by-County (WBC) Operations
Last Updated 2/12/09
National Weather Service
Office of Climate, Water, and Weather Services
Questions: Shannon.White@noaa.gov
Viewing a new WCL
Creating a WCN when a new WOU arrives
Removing Counties/Parishes/Marine Zones from a Watch
Manually adding Counties/Parishes/Marine Zones to a Watch
Manually Replacing a Watch
Extending the Valid Time of an Entire Watch
Extending the Valid Time of Part of a Watch
Cancelling/Ending an Entire Watch Early
Expiring a Watch
GFE must be running on your workstation.
1. A yellow banner will display on GFE notifying you a WCL has arrived. The yellow banner will instruct you to run the ViewWCL from the Hazards menu.
2. Acknowledge the yellow banner.
3. Under the Hazards drop down menu, click ViewWCL.
4. The ProposedWatches temporary grid will be created and the proposed watch area will be displayed.
Click on the ProposedWatches grid to make it the active weather element if it isn't already. The ProposedWatches grid is for
coordination with SPC to decide the final counties/parishes/marine zones to be included in a watch. It will be discussed on the ensuing conference call.
Note the color bar at the top of the graphic. It explains what actions will occur in each part of your CWA when the WCN is run.
If you have problems viewing a WCL, have the IFPS focal point or ITO check for any extra, non-baseline WCL procedures.
Creating a WCN when a new WOU arrives
The initial WCN should be issued within 15 minutes of the initial WOU.
1. A yellow banner will display on GFE alerting you that a new convective watch has arrived (i.e. Severe Thunderstorm Watch ### or Tornado Watch ###)
This alert is telling you that SPC has issued the Watch Outline Update (WOU). The WOU is the official NWS watch product.
2. Acknowledge the yellow banner.
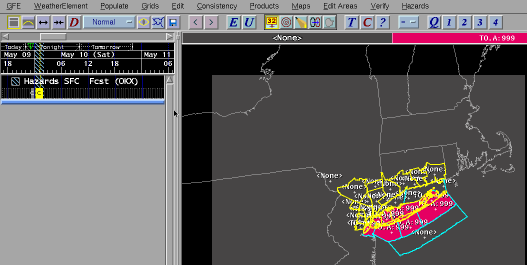
3. If hazards are currently separated into temporary hazard grids, finish your edits then click MergeHazards from the Hazards drop down menu.
4. Under the Hazards drop down menu, click PlotSPCWatches. This will plot the watch into the Hazards grid. Click on the Hazards grid to display the watch if desired.
Since the PlotSPCWatches operates directly on the Hazard grid, if other convective watches were in effect for part of the new watch area, the tool will take care of the needed watch replacements.
If the WOU does not match the area you thought would be boxed, call SPC to inform them of needed changes immediately. But the initial WCN and the initial WOU must match. Changes can be made in WCN updates. See the job sheets on removing or adding areas to a watch.
5. Click on the blue disk to Save the Hazards grid. Click Save Weather Elements.
6. On the Products drop down menu, click Publish to Official. Make sure to Publish the entire length of the watch!
7. Under the Products drop down menu, click Formatter Launcher.
8. In the Formatter Launcher window, click Products, then click Hazard, then click Hazard_WCN (Convective Watch).
9. Click on the silver gear button to start the WCN formatter, which will create the WCN product.
10. When the WCN product comes up on the screen, proof the WCN product, and run the spell check.
Do NOT change the product expiration time as it is properly set upon creation.
11. When you are ready, click Transmit to send the product. Click Transmit again on the transmit window which comes up to actually issue the product.
12. Check the GHG Hazards Monitor to ensure the WCN is there which verifies the transmit was successful.
Removing Counties/Parishes/Marine Zones from a Watch
1. Call SPC to inform them of the change to a watch you wish to make.
2. Click on the Hazards grid to display the current hazards on the screen.
3. In the Hazards drop down menu, click SeparateHazards. A temporary hazard grid will be created for each watch (and other hazard) in effect.
4. Click on the watch you wish to edit, then click MakeHazard from the Hazard drop down menu.
You can also edit the temporary watch grid directly using basic editing tools as opposed to the MakeHazard tool.
5. Left click once on each red county/parish/marine zone you wish to remove. They will change to the default black background of the tool.
6. Click Run/Dismiss at the bottom of the tool.
7. In the Hazards drop down menu, click MergeHazards.
8. Repeat process for any other watch from which you wish to clear an area.
9. Click on the blue disk to Save the Hazards grid. Click Save Weather Elements.
10. On the Products drop down menu, click Publish to Official. Make sure to publish the entire length of the watch!
11. Under the Products drop down menu, click Formatter Launcher.
12. If previous WCN is already in the product editor, skip to step 13. Otherwise, click Products, then click Hazard, then click Hazard_WCN (Convective Watch).
13. Click on the silver gear button to start the WCN formatter, which will create the WCN product.
14. When the WCN product comes up on the screen, proof the WCN product, and run the spell check.
Do NOT change the product expiration time as it is properly set upon creation.
15. When you are ready, click Transmit to send the product. Click Transmit again on the transmit window which comes up to actually issue the product. Do not issue a WCN within 5 minutes of the top of the hour (10 minute window) as it will not be picked up by the WOU.
16. Check the GHG Hazards Monitor to ensure the WCN is updated which verifies the transmit was successful.
Manually adding Counties/Parishes/Marine Zones to a Watch
(Only needed if you are making changes to an SPC-delivered watch)
1. Call SPC to inform them of the change to a watch you wish to make. If the watch is not in effect for any of your counties/parishes already, these steps do not work. A new watch will be needed.
2. Click on the Hazards grid to display the current hazards on the screen.
3. In the Hazards drop down menu, click SeparateHazards. A temporary hazard grid will be created for each watch (and other hazard) in effect.
4. Click on the watch you wish to edit, then click MakeHazard from the Hazard drop down menu.
You can also edit the temporary watch grid directly using basic editing tools as opposed to the MakeHazard tool.
5. Left click and drag in the unselected county/parish/marine zone(s) you wish to add. They will become red when added.
6. Click Run/Dismiss at the bottom of the tool.
7. In the Hazards drop down menu, click MergeHazards.
8. Repeat process for any other watch to which you wish to add an area.
9. Click on the blue disk to Save the Hazards grid. Click Save Weather Elements.
10. On the Products drop down menu, click Publish to Official. Make sure to publish the entire length of the watch!
11. Under the Products drop down menu, click Formatter Launcher.
12. If previous WCN is already in the product editor, skip to step 13. Otherwise, click Products, then click Hazard, then click Hazard_WCN (Convective Watch).
13. Click on the silver gear button to start the WCN formatter, which will create the WCN product.
14. When the WCN product comes up on the screen, proof the WCN product, and run the spell check.
Do NOT change the product expiration time as it is properly set upon creation.
15. When you are ready, click Transmit to send the product. Click Transmit again on the transmit window which comes up to actually issue the product. Do not issue a WCN within 5 minutes of the top of the hour (10 minute window) as it will not be picked up by the WOU.
16. Check the GHG Hazards Monitor to ensure the WCN is updated which verifies the transmit was successful.
1. Call SPC to inform them of the change to a watch you wish to make.
2. Click on the Hazards grid to display the current hazards on the screen.
3. In the Hazards drop down menu, click SeparateHazards. A temporary hazard grid will be created for each watch (and other hazard) in effect.
You will need to remove the counties from the original watch then add them to the new watch. This can only be done after the WCN for the new watch has already been issued.
4. Click on the watch from which you wish to remove counties/parishes/marine zones, then click MakeHazard from the Hazard drop down menu.
You can also edit the temporary watch grid directly using basic editing tools as opposed to the MakeHazard tool.
5. Left click once on each red county/parish/marine zone you wish to remove. They will change to the default black background of the tool.
6. Click Run/Dismiss at the bottom of the tool.
7. Click on the watch to which you wish to add counties/parishes/marine zones, then click MakeHazard from the Hazard drop down menu.
8. Left click and drag in the unselected county/parish/marine zone(s) you wish to add. They will become red when added.
9. Click Run/Dismiss at the bottom of the tool.
10. In the Hazards drop down menu, click MergeHazards.
11. Click on the blue disk to Save the Hazards grid. Click Save Weather Elements.
12. On the Products drop down menu, click Publish to Official. Make sure to publish the entire length of the watch!
13. Under the Products drop down menu, click Formatter Launcher.
14. If previous WCN is already in the product editor, skip to step 15. Otherwise, click Products, then click Hazard, then click Hazard_WCN (Convective Watch).
15. Click on the silver gear button to start the WCN formatter, which will create the WCN product.
16. When the WCN product comes up on the screen, proof the WCN product, and run the spell check.
Do NOT change the product expiration time as it is properly set upon creation.
17. When you are ready, click Transmit to send the product. Click Transmit again on the transmit window which comes up to actually issue the product. Do not issue a WCN within 5 minutes of the top of the hour (10 minute window) as it will not be picked up by the WOU.
18. Check the GHG Hazards Monitor to ensure the WCN is updated which verifies the transmit was successful.
Extending the Valid Time of all of a Watch in your CWA
1. Call SPC and your surrounding WFOs to inform them you wish to extend the valid time of a watch. If you only wish to extend part of the watch, follow these instructions.
It is important to contact other WFOs as the entire watch will be extended through the WOU. If other offices want the watch to end at the original time, they will need to cancel or expire the watch manually before the extension is issued. If a neighboring WFO wishes to extend some of their area as well, they can partially extend their area as well.
2. Click on the Hazards grid to display the current hazards on the screen.
3. In the Hazards drop down menu, click SeparateHazards. A temporary hazard grid will be created for each watch (and other hazard) in effect.
4. Click on the watch you wish to extend.
5. Using the middle mouse button, drag the end time of the watch to the new ending time.
6. Repeat process for any other watch you wish to extend.
7. In the Hazards drop down menu, click MergeHazards.
8. Click on the blue disk to Save the Hazards grid. Click Save Weather Elements.
9. On the Products drop down menu, click Publish to Official. Make sure to publish the entire length of the watch!
10. Under the Products drop down menu, click Formatter Launcher.
11. If previous WCN is already in the product editor, skip to step 12. Otherwise, click Products, then click Hazard, then click Hazard_WCN (Convective Watch).
12. Click on the silver gear button to start the WCN formatter, which will create the WCN product.
13. When the WCN product comes up on the screen, proof the WCN product, and run the spell check.
Do NOT change the product expiration time as it is properly set upon creation.
14. When you are ready, click Transmit to send the product. Click Transmit again on the transmit window which comes up to actually issue the product. Do not issue a WCN within 5 minutes of the top of the hour (10 minute window) as it will not be picked up by the WOU.
15. Check the GHG Hazards Monitor to ensure the WCN is updated which verifies the transmit was successful.
Extending the Valid Time of Part of a Watch
1. Call SPC and your surrounding WFOs to inform them you wish to extend the valid time of a watch.
It is important to contact other WFOs as the entire watch will be extended through the WOU. If other offices want the watch to end at the original time, they will need to cancel or expire the watch manually before your extension is issued. If a neighboring WFO wishes to extend some of their area as well, they should follow these instructions for their area as well. If they do nothing, they will be unable to issue another WCN for the watch.
2. Open the MakeHazard tool by clicking Hazards --> MakeHazard from the GFE menu bar. Do NOT pre-select (i.e. prime with) the existing watch as that will cause a change in the expiring area, which is not desired.
3. Select the Convective Watches category.
4.Select either Tornado or Severe Thunderstorm and add the watch number to the ETN/Segment Number box.
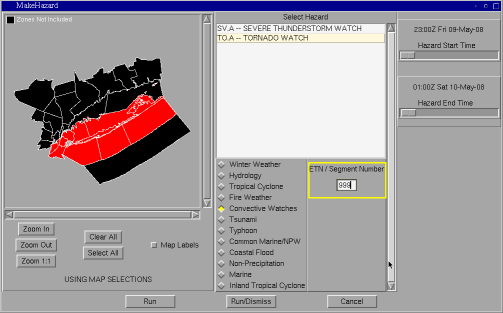
5. Select desired area.
6. Adjust the time by one or two hours. Always start at the current time and have it end in the number of hours you wish to extend the watch.
8. Click on the blue disk to Save the Hazards grid. Click Save Weather Elements.
9. On the Products drop down menu, click Publish to Official. Make sure to publish the entire length of the watch!
10. Under the Products drop down menu, click Formatter Launcher.
11. If previous WCN is already in the product editor, skip to step 12. Otherwise, click Products, then click Hazard, then click Hazard_WCN (Convective Watch).
12. Click on the silver gear button to start the WCN formatter, which will create the WCN product.
13. When the WCN product comes up on the screen, you will have 2 segments, one EXT and one EXP. Proof the WCN product, and run the spell check.
Do NOT change the product expiration time as it is properly set upon creation.
14. When you are ready, click Transmit to send the product. Click Transmit again on the transmit window which comes up to actually issue the product. Do not issue a WCN within 5 minutes of the top of the hour (10 minute window) as it will not be picked up by the WOU.
15. Check the GHG Hazards Monitor to ensure the WCN is updated which verifies the transmit was successful.
Cancelling/Ending an Entire Watch Early
1. Call SPC to inform them you wish to end a watch early.
2. Click on the Hazards grid to display the current hazards on the screen.
3. In the Hazards drop down menu, click SeparateHazards. A temporary hazard grid will be created for each watch (and other hazard) in effect.
4. Click on the watch you wish to cancel, then right click and hold for menu.
5. Drag down to Delete Grid and release mouse button.
6. Repeat process for any other watch you wish to end early.
7. In the Hazards drop down menu, click MergeHazards.
8. Click on the blue disk to Save the Hazards grid. Click Save Weather Elements.
9. On the Products drop down menu, click Publish to Official.
10. Under the Products drop down menu, click Formatter Launcher.
11. If previous WCN is already in the product editor, skip to step 12. Otherwise, click Products, then click Hazard, then click Hazard_WCN (Convective Watch).
12. Click on the silver gear button to start the WCN formatter, which will create the WCN product.
13. When the WCN product comes up on the screen, proof the WCN product, and run the spell check.
Do NOT change the product expiration time as it is properly set upon creation.
14. When you are ready, click Transmit to send the product. Click Transmit again on the transmit window which comes up to actually issue the product. Do not issue a WCN within 5 minutes of the top of the hour (10 minute window) as it will not be picked up by the WOU.
15. Check the GHG Hazards Monitor to ensure the watch is no longer there which verifies the transmit was successful.
1. Watch must be plus/minus 30 minutes of expiration time.
2. Under the Products drop down menu, click Formatter Launcher. NO edits need to be made to any watches.
Do NOT delete the expired watch from the Hazard grid! GFE knows to properly generate an expiration statement.
3. If previous WCN is already in the product editor, skip to step 4. Otherwise, click Products, then click Hazard, then click Hazard_WCN (Convective Watch).
4. Click on the silver gear button to start the WCN formatter, which will create the WCN product.
5. When the WCN product comes up on the screen, proof the WCN product, and run the spell check.
Do NOT change the product expiration time as it is properly set upon creation.
6. When you are ready, click Transmit to send the product. Click Transmit again on the transmit window which comes up to actually issue the product. Do not issue a WCN within 5 minutes of the top of the hour (10 minute window) as it will not be picked up by the WOU.
7. Check the GHG Hazards Monitor to ensure the watch is is no longer there which verifies the transmit was successful.